Friday, December 19, 2008

Flat Spiral's - A Virulent Strain


Well, is there any beader on the planet who hasn't done a Flat/Square Spiral? Thanks to the video on Auntie's beads, it seems as if every beading group on the Internet is inundated with dozens of pictures of new bracelets made in this pattern. Every one different and every one beautiful.

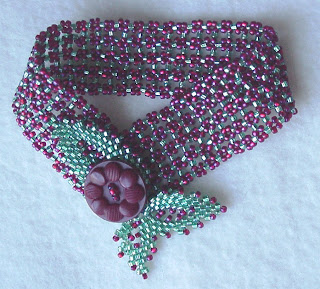
The pattern works up so quickly that a bracelet can be completed in one sitting and the beads used are reasonable in price. I've done two, one I did almost two years ago in all blues and one I did recently that is reversible - See picture. When you pick up the string of 11/0's, pick up the first group in one color and pick up the second group in another color and that's how you get the reversible look.

For the core bead I have a tendency to use Firepolish as I like the way they sit and look. The facets give the sparkle of crystal, yet not the sharp edge of bicones or the expense of rounds. For the edge bead I use 10/0 Cuts which are sometimes hard to find. I got mine from Foxden on the net.
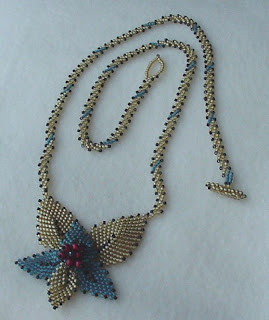
Some of the more ambitious beaders made this pattern two and three rows wide which then takes on the look of a pattern published in Beadwork in the February/March 2007 issue under the name Black Magic by Liz Smith.
If you haven't made one of these bracelets yet, there is still time before Christmas to whip out a gift for someone (maybe yourself). My pattern below lists the beads I used in the reversible, but please do a couple and try different beads. 15/0's can sub for 11/0's. Round gemstones could be used in place of the Firepolish and 8/0's in hex or triangles can sub for the 10/0 cuts.
Beads needed: Core beads 4mm Firepolish(FP) with 11/0 seed beads (two colors if you want reversible A & B) and 10/0 Cuts. Can be woven on Fireline, Power Pro or nylon beading thread.
On a comfortable length of thread, pick up two FP, (beginning of central spine)leaving a 8” tail to add the Toggle closure.

Then string three 11/0's Color A, one 10/0 Cut and three 11/0's Color B and go back up through the two original FP to form a loop - Push this loop to one side. Repeat this step and push the second loop to the other side.
*Pick up one FP, three 11/0's Color A, one 10/0 Cut and three 11/0's Color B then loop around to go back up through the last two FP on the core. Then pick up three 11/0's Color A, One 10/0 Cut and three 11/0's Color B and go through the same two FP.
Repeat from * until bracelet is the desired length. Then one half of the toggle closure on this end. Put the needle on the other end and sew on the other half of the toggle closure.

Enjoy your bracelet and congratulate yourself. If you need to see the video, go to Auntie's Beads and under the Karla Kam look for the Flat Spiral. Happy Beading and Happy Holidays.
Today's tip: Flatten your thread, especially thick Fireline or Power Pro with pliers to make threading your needle easier. Otherwise it's like putting a round peg in an oval hole.

Thursday, November 20, 2008

Whirlwind

I have had a fantastic couple of weeks and so busy I couldn't get to blog. I flew to Louisville, Ky to visit a friend who had set up a beading class for me to teach with Geri (one gracious lady). www.beadweaversonline.com Geri has a Beadweaver's shop in the Mellwood Art Center, where she holds classes and sell beads, finished jewelry and has a second store where her students can sell their work.


I taught a 4 hour bracelet class with an Ndebele base and embellished with flower, leaves and a butterfly. Five wonderful beaders participated and we have a great time. I can't wait to go back and teach again.

The next day, I spoke at the Unity Church in Middletown. (In my previous life, I retired from ministry in Colorado.) Then I did a workshop for the church.


For the next three days, my friend Sharon drove me all over Louisville and showed me the sights. There is a wonderful glassblowing factory in downtown. It was fun to watch how this hot liquid becomes such a beautiful creation. We also visited an art installation in the hotel 21C. In the ladies restroom is a mirror with small TV screen set in it and constantly showing on the screen are the eyes of people looking around. The we went to the Kentucky Arts and Crafts Museum where many Kentucky artists have items for sale and the current major display was of woven tapestries. You have to see them upclose to realize how much work is involved. The one that really caught my attention was of a woman's face (and many other images) but the face was so realistic in color, texture and shading, you almost waited to hear her speak.


As soon as I got back, I had a class that night, then duties at church on Sunday and Monday. Then Monday evening I found a group of beaders who meet in the Palm Harbor area at Uncommon Threads and I joined them for an evening of beading and chatting. Some exquisite work was shown. One lady was working on the Star Compass Purse in the recent Beadwork Magazine, but she had enlarged it to about 10" across.


Then on Tuesday I participated in the Great American Teach-in at an elementary school in the Clair-Mel area and had 30 girls to learn a 2 drop peyote. They were so eager and so much fun, but by the time I finished, I was hoarse.

On Wednesday, I met with my usual group and taught them a new trick on an old techique.

Then Wednesday night I met with 6 beaders for another Ndebele bracelet with inclusions. I'm winding down now, but what a great time I had.

I'll look for another project for my next blog and in the meantime, a tip I learned was to use chapstick to coat your thread if you forget your Thread Heaven or microcrystaline wax. Rub you finger lightly over it and then pull the thread through your fingers. It seems to help with the Fireline tangling too. Try it.

Wednesday, November 5, 2008

Russian Leaves Eye Candy

To follow up on the article on Russian Leaves, here are some examples of the ways they can be used. I really like using them as a loop for toggles, especially when there are leaves on other parts of the work.


When leaves are used as the toggle on a bracelet, they become the focal point and the band no longer vies for attention.


When grouped together (5 or 6) they make a nice pendant for a St. Petersburg chain. The one here is done in southwest colors with black accents.


Notice the black leaves on the pumpkin colored sweater. The leaves were don in black with red tips matching the colors in the sweater. Later the leaves were sewn on to cover a pull in the knitting and complimented the embroidered leaves in the green thread (not visible in this shot).

Hopefully, these examples have given you some inspiration.
Leaf On,
Marilyn

Saturday, November 1, 2008

Russian Leaves Are Easy and Useful

Russian Leaves seem to be one stitch many people want to learn, yet not everyone knows how to teach it. I took a class at a Bead Fest and didn't quite get it from the instructions or the instructor.


When I got home, I practiced and realized the problem was that I kept getting lost in the instructions and didn't know where I was going next. These particular instructions were not separated into steps and it was hard to keep my place, so I broke it down and marked where each turn was and then I finally got it.
In all the instructions I've seen, you put a stopper bead in the middle of the thread so that you can work each side of the leaf from the center. I like to use two different sizes of beads such as 11's (Bead A Green )and 15's (Bead B Red). String one A, seven B, one A and one B. These beads will be pushed to the stopper bead and this is the center of the leaf with the stopper bead being at the top inside. See Picture 1


When you turn to go up the strand as seen in the photo, you are at the bottom outside of the leaf. When you get to the top (where the stopper bead is, you are at the top inside) Put the needle through the 6th bead of the original 7.

Then work every other bead (peyote stitch) by picking up one, skipping one, going through one, exiting the red size 15 at the top. (The stopper bead is ignored for now.) The second and third pictures show the beads loose, but worked in peyote and then tightened into position.


*Next, pick up 1 A and work the peyote stitch to the next to last protruding bead. Picture 4


** This is the bottom turn. - Note: it is at the opposite end from the Stopper bead and two beads are picked up for this turn.


Pick up 1 B, 1 A and go up through the last A bead added in the last row. Now you will be working toward the top and you have made the first bottom turn, which will be repeated all the way up the outside bottom edge. Peyote the next two stitches exiting the top bead. Each time you go up to the top, make certain you exit the A bead.


***This is the top turn - Note it is at the same end as the Stopper bead and uses three beads to create the turn.

With thread exiting the top bead, pick up one A, one B, and one A and push the bead down the thread next to the finished work. Put the needle back through the first of these three beads, pull snug and peyote down to the to the next to last bead.Go back to the bottom turn and repeat until the side is the desired length.

Then remove the stopper bead and repeat from the *. To make certain the sides are even, count the outer red bead and complete the same number, using the center bead as #1 on each side.

Today's tip: Stopper beads are useful for maintaining and tightening tension as well as keeping your initial strand of beads from fallling off. Using a Size 11 bead for your stopper bead will keep the tension better than a Size 8, which has a tendency to slide down the thread on it own.
Walking the bead of a different drum. Marilyn


Thursday, October 30, 2008

One Thread, Two Thread, Red Thread, Blue Thread


Is Dr. Suess in the house? Oh, that's right he was talking about fish. No fish here, just some comments about which thread to use.

Hopefully, the chart on the right shows up well enough to see the way different colored threads affect the look of the beads. This chart was an item Diane Fitzgerald used in her class on Gingko Leaves. I hope she doesn't mind that I am showing it here. I was amazed that with opaque beads, the thread made that much difference.


These four little swatches were worked in peyote stitch with the color of thread noted to the side, all using the same yellow opaque bead. The swatch marked red looks like it rusted, the blue looks like an olive that has been in the martini too long, and the purple just looks muddy. The cream makes the beads glow.


Now I'm not saying you can't use a darker thread or a different color, just as long as you know what the finished item will look like. You may want to create a new color or cause a color shift in the work, especially if it enhances the beads around it. Also, if you can't find the right shade of a particular color bead, this is certainly one way to do it. The caution is be careful not to dull the work.

Another good example of thread color making a difference appears in an article by Australian beader, Jill Oxton in her Cross Stitch and Beading Magazine, Issue 58 where she shows on Page 22, two samples of a beaded picture of a Sugar Glider (small Australian marsupial) that are strikingly different. She used silver and black thread in one picture and all black thread in the other. The one with all black thread looks dull and lifeless. The other one sparkles and animates the little fellow very well.

I know that Fireline is a favorite of many beaders because of it's strength and tendency not to split or fray, but since it only comes in two colors, Smoke and Crystal, just look at what adding other colors to your work may do. Recently I tried a new thread called One G. It's as if they put all the best of the colors in thread (Nymo, Silamide, Conso, etc) together in a more Fireline-like product. It is a bit more expensive, but to get good results using color, this is a great new product. And I hope that the more we use it, the quicker the price will drop.

One thread I frequently use is Power Pro. It is another fishing line like Fireline, but for me it doesn't seem to tangle as much and I find it easier to undo when it does tangle. It does require sharp scissors (Fiskars) to cut it cleanly and because it is braided, it is hard to get through a needle smaller than a Size 10. I flatten the end with pliers (or more often than not, with my teeth.)
It too, only comes in two colors, Moss Green and White for beading, but the fishing stores and manufacturer have other colors available, including blue, red and yellow. I also think it ties firmer and stays in place better since it has a bit more texture.

An example of using Power Pro or Fireline to its best advantage went into this bracelet. Because of the weight, I needed the base to be very secure.


Another note for beaders looking for bargains, both Fireline and Power Pro are much cheaper if purchased from fishing stores rather than bead stores. The quantity spooled for beads is much smaller and we all know that packaging smaller quantites makes products cost more. It is another way to look out for our environment.

No matter which thread you choose, always give the finished look your first consideration in making that decision.

Tip for today: Threading needles - have you tried needling the thread?

Pinch the thread between the thumb and forefinger and pull it so the end of the thread just begins to disappear. Then, pinching your fingers slightly tighter, push the eye of the needle over the thread. For the longest time, I couldn't do this and realized I was letting too much thread show. Now I can do this successfully about 98% of the time. Try it.
Bead on,
Marilyn


Wednesday, October 29, 2008

Another Beady Day


Do you know what lentil beads are? Not beans, beads. Well here's a picture. These are Swarovski crystal lentils. Size 10mm in Vitrail Medium II. They are drilled from front to back with the hole being set to one side. They look a lot like a rivoli with a hole in it. I found them in two stores, Beyond Beadery in Colorado and Beads Gone Wild in West Palm Beach.

I fell in love with them after a friend asked me to repair a necklace that her aunt had given her. The necklace was completely unstrung, so I didn't know how to put it back together. I searched the internet and found some examples from the 1940's and 50's where the vintage crystals were strung. One was up and the beads on either side hung down, but you were looking at them from the side, so you didn't get the full impact of their beauty.

Since then, I have purchased over 100 and here is but one of the ideas I've had for them. The rope is Herringbone (Ndebele) spiral, then straight across the front, then spiralling again. When the rope was complete, I then anchored the thread at the straight area and criss-crossed over the rope adding a lentil at each point on the bottom.


Another pattern appeared in a beading magazine that had the lentils standing up using the Ndebele stitch. I worked a bracelet of lentils that are not crystal, as the edges are too sharp on the crystal. The beads have a finish that makes them look like they just washed up on the beach, very much like labradorite.


Here's a picture of the crystals from another angle that shows how sharp the edges are. Beautiful, but deadly, especially on a bracelet.


Next time you're shopping, if you see lentils, give them a try.


Today's tip: Needles that are hard to thread may be turned backwards. Roll the needle around and come in from the other side. The eye is punched out with a bevel shaped die and sometimes the back side is not as cleanly cut as the front, thus making it harder to put thread through it.

Happy beading, Marilyn


Tuesday, October 28, 2008

Beading Ideas

In today's economy, beading and other crafts are filling the need to be creative, yet keep the budget to a minimum. In my blog, I will share ideas, tip and techniques and the occassional pattern.

The necklace in this blog came about in an unusual way. I had taught a class on Russian Leaves (peeking out from behind) and made a pair of pink earrings. A friend of mine (Sharon) took them as soon as she saw them. Months later she gave them back saying she would never wear them. So I created this necklace with the netted flower from Barb Grainger's book, a lampwork bead from a mutual friend, Sally and called it Rose of Sharon. From this piece, I have gotten some notice when Sharon wears it and I'll be teaching a class in the Mellwood Art Center in Louisville, Ky. at the bead store there on Nov. 8th.
The class prpject photo is shown below.


I belong to a number of online beading groups who share their treasures with the group. It is a great feeling to get an e-mail with a compliment on your latest piece of art. And these beaders are often eager to share their ideas and expertise. Some of the beaders are new and just learning and it reminds me of when I was a beginner-back in 1986. Amazing how much I have learned and yet how much there is to learn.

As a beader who specializes in off-loom beadweaving, most of the items I make are for the enjoyment of beading, but I do share them with family and friends as gifts. On occassion someone purchases something I've made and it give me great satisfaction to know my work has been appreciated.


Todays's tip is to bead what you like and do your best. This may sound simple, but behind the simplicity is the desire to sell or impress or turn out quantity rather than quality. If you focus on doing what you like to do, you are more likely to end up with a better product. It doesn't matter if you prefer stringing or weaving, quality should be the end result.